
Those Death Screen Blues got you down? Want to stop Windows 10 from automatically updating your system with potentially bug-infested patches? We’ve got the answer, so read on and find out how to disable automatic updates in Windows 10 for good. Generally, keeping your system updated with the latest patches is a good idea. They keep your computer secure and improve its performance. The reality of Windows updates, however, is an entirely different story.
Windows updates don’t always end up enhancing your system. They’re actually well-known for making things a lot worse. They can cause your software to stop functioning and sometimes they break your operating system altogether. There’s also the famous Blue Screen of Death, which sooner or later, you will experience after an update. If you luck out and none of these quite-common disasters take place, there are still the sudden restarts to consider. A sudden restart can severely damage your workflow, not to mention ruining that movie you were watching.
For all these reasons and for quite a few others, you may find yourself needing to turn off the automatic update feature on your Windows 10 operating system. There are different ways to go about it, with slightly different outcomes. Basically, you can choose to stop the automatic updates temporarily (up to 35 days) or permanently. Here, we’ll cover all of them so you can choose whichever is most convenient (plus a cheat code at the very end of the page). First up is the most straightforward method: using Settings.
How to Disable Automatic Updates in Windows 10 Using Settings
This is the simplest method for disabling automatic updates in Windows 10, but it can only stop them for a specified period, 35 days at the most. You can use it to wait for specific updates, like the monthly updates Microsoft offers on the third or fourth Tuesday of every month (sometimes called Patch Tuesdays). Now, let’s get right down to it.
Step 1: Open the Windows Update Settings
The first step is to get to the config screen responsible for updates in Windows 10. To do that,
- Open Settings.
- Click on Update & Security.
- Click on Windows Update.
![[Screenshot of Windows Update Settings]](https://cloudzy.com/wp-content/uploads/image6-2.png)
Click the Advanced options button.
You should be seeing something like this:
Reliable, high-performance RDP servers with 99.95 uptime. Take your desktop on the go to all the major cities in the US, Europe, and Asia. Need a Remote Desktop?
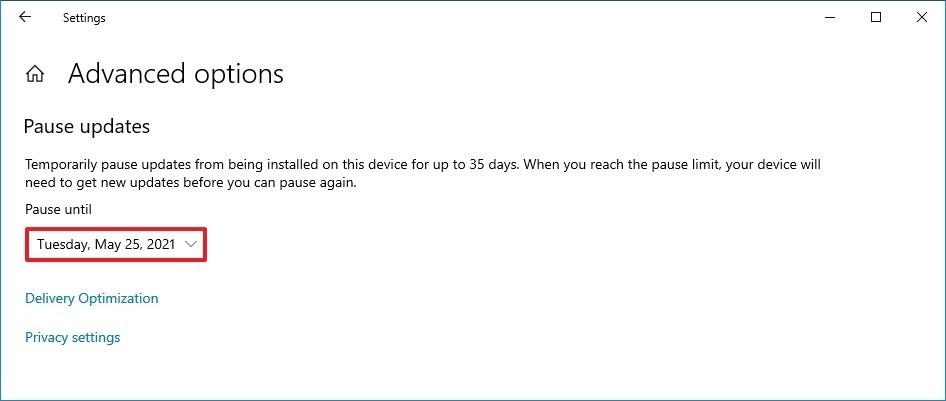
Step 2: Select the Pause Updates Option
Now, find the “Pause updates” section and use the drop-down menu to choose how long you want to keep Windows from automatically downloading and installing updates. As you can see, there is no “forever” option on the menu.
Once you have finished with step 2, you have succeeded at delaying the automatic update feature. Technically, you can keep doing it every 35 days, but there is a catch why it wouldn’t be the same as a permanent fix. Once 35 days pass, you need to install the latest patch in order to activate the “pause updates” option again. That means you will be forced to at least update every month or so and you also have to repeat the process every time.
If that’s not acceptable, you can try one of the following methods, which are a bit harder but can get Windows to permanently disable automatic updates. Let’s take a look at how it can be done using Windows Group Policy.
How to Disable Automatic Updates in Windows 10 Using Group Policy
Windows 10 Pro has a built-in feature called Group Policy Editor, which lets you control numerous aspects of your computer. It contains almost all the same configurations that you can access from the registry, but there is significantly less risk. If you are using the Windows 10 Home edition, you won’t be able to access the Group Policy Editor by default. You can either use the registry method or just enable the editor in one simple step, as explained right here in this tutorial. Here’s how you can disable Windows 10 update popup using the policy editor:
Step 1: Launch the Group Policy Editor
First, we need to open the Group Policy Editor:
- Open the Start menu.
- Search for gpedit.msc or edit group policy and click on the top-most result
![[Searching for the Group Policy Editor from the Start Menu]](https://cloudzy.com/wp-content/uploads/image1-2.png)
Step 2: Find the Automatic Update Policy
Using the navigation menu on the left, navigate to the following path:
Computer Configuration -> Administrative Templates -> Windows Components -> Windows Update
On the right, find and open the Configure Automatic Updates policy.
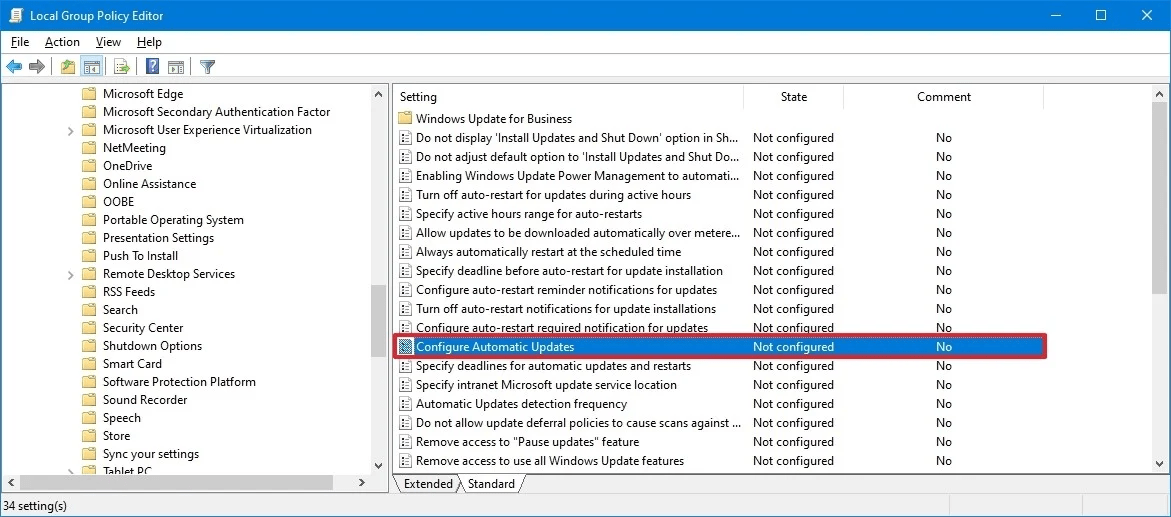
Step 3: Configure the Automatic Update Policy
In the policy configuration window, choose the Disabled option to disable Windows 10 update restart.
![[The Policy Configuration Screen]](https://cloudzy.com/wp-content/uploads/image9.png)
How to Enable Local Group Policy Editor in Windows 10 Home
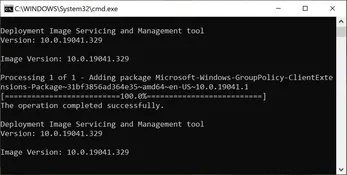
As we mentioned previously, the Group Policy Editor is not available in Windows 10 Home edition. No need to think about upgrading to Windows 10 Pro, however, as there are easy ways to enable it for the Windows you already use. Since this is not a full tutorial, we’ll only cover the most simple fix, which also happens to be the most reliable.
First, you need to download this batch file on your Windows 10 Home system:
gpedit_enabler.bat
Once that’s done, open the download folder and find the batch file you just downloaded. Right-click on it and select Run as Administrator. You should see the command line scrolling through some texts, looking something like this:
The final method we discuss in this tutorial on how to permanently disable Windows 10 updates is to directly edit the Windows registry. We recommend you use it as a last resort.s
How to Disable Automatic Updates in Windows 10 Using Registry
While the Registry Editor lets you configure a wider variety of features, you take a significant risk whenever you use it to edit some registry key or another. With the Registry Editor, there is always a chance of breaking your installation for good. So, before going any further, you should make a full backup of your system. Done? Okay, take a deep breath and go through these steps carefully:
Step 1: Launch the Windows Registry Editor
As always, the first step is to open the editor. There are two ways to go about that. The easier one is to open the Application Launcher (by pressing Windows Key + R) and enter regedit. The second one is this:
- Open Start menu.
- Search for regedit and click the top-most result, which should be the Registry Editor.
Now you should be looking at something like this:
![[Screenshot of the Registry Editor]](https://cloudzy.com/wp-content/uploads/image2-2.png)
Use the navigation menu on the right and navigate to the following path:
HKEY_LOCAL_MACHINE\SOFTWARE\Policies\Microsoft\Windows\
On the left, right-click on the Windows folder (called a key in Registry Editor), select New, and from the submenu, select Key.
![[Navigating to the Windows folder in the Registry Editor]](https://cloudzy.com/wp-content/uploads/image7-2.png)
Step 3: Configure the Registry Key
- Name it as WindowsUpdate and press <Enter>
- Right-click on the key (folder) you just made and select New. From the submenu, click on Key again
- Name this new key AU
- Right-click on AU and select New. From the submenu, choose DWORD (32-bit) Value
- Name it as NoAutoUpdate and press <Enter>
You will see NoAutoUpdate appear on the right. Double-click on it and use the text box to change its value from 0 to 1
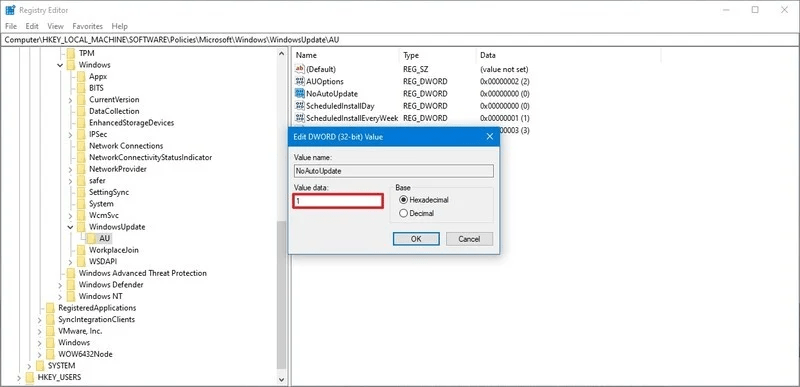
Click OK.
All that’s left is to restart your computer. Once Windows is back up, it won’t automatically download and install updates anymore.
What’s Next?
You’ve succeeded at disabling those annoying auto-updates. Well done! So, what to do if you need to get a crucial security update? Not to worry, you can still download and install any update you want by going to the Update screen in Settings and clicking on Check for Updates.
Reliable, high-performance RDP servers with 99.95 uptime. Take your desktop on the go to all the major cities in the US, Europe, and Asia.
Need a Remote Desktop?
Do you find doing all that as annoying as we do? Of course you did, but what can you do, right? Well, you can always consider getting an RDP Server and letting the provider do all the updates for you. That makes sense, especially if you’re using an older computer. You can just switch to a lighter operating system and do your job from your virtual computer. You can read our article explaining RDP and its advantages. You can also take a look at the many RDP plans we have on offer — you are guaranteed to find something you like.


![How to Make a Modded Minecraft Server? 👾 [2024 Guide]](https://cloudzy.com/wp-content/uploads/How-to-Host-a-Modded-Minecraft-Server-1-420x234.png)


0 Comment