
💡 Note: Setting up a secure FTP server on Windows? Our Windows VPS hosting offers simplicity, security, and high performance for an effortless setup. Ensure your FTP server runs smoothly and securely. Click to enhance your FTP experience.
Just because running servers and Windows 10 don’t exactly mix doesn’t mean you can’t get something set up. If you’re planning to set up an FTP server to transfer files over the network but don’t want to switch to a server edition or a Linux distro, this guide is for you. There are many reasons why you may want to start an FTP server. One of the most common reasons for a private FTP server is transferring large files without paying a lot for cloud storage fees.
With small files, using cloud storage services like Google Drive makes sense, but as the size of the files you want to transfer increases, the prices rise quickly. That’s when you should think about taking the time to turn your Windows 10 into an FTP. Here, I’ll show you how to do that before revealing a much easier way to get it done.
 Windows 10 VPS Hosting
Get yourself an efficient Windows 10 VPS for remote desktop, at the cheapest price out there. FREE Windows 10 running on NVMe SSD storage and high-speed internet.
Check Out Windows 10 VPS PlansSteps to Create an FTP Server in Your Windows 10
- Activate IIS on Windows 10
- Configure an FTP Server on Windows 10
- Configure Windows Firewall for an FTP Server
- Enable Port Forwarding on your Route
Windows 10 can turn into an FTP server without additional software. But this tool is disabled by default and you need to enable it first.
To create an FTP server in Windows 10 you need to enable a Windows utility called Internet Information Services. Microsoft created the IIS to support HTTP, HTTPS, FTP, FTPS, and SMTP, among other protocols.
How to Activate IIS on Windows 10?
To activate IIS on Windows 10, follow these steps:
Step 1: Open the launch section
Press ‘WinKey + R’.

Step 2: Type appwiz.cpl
Type in “appwiz.cpl” and press Enter.
appwiz.cpl
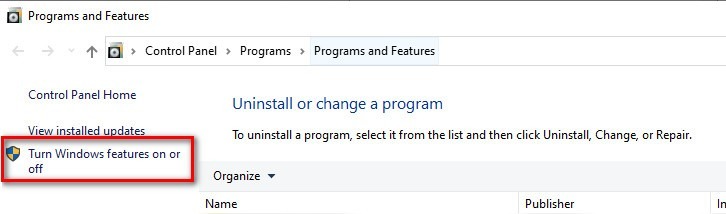
Step 3: Turn Windows features
From the left-hand panel, click on “Turn Windows features on or off.”
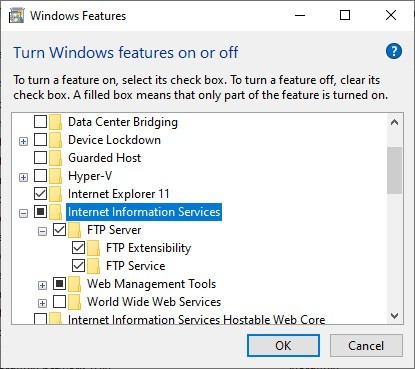
Step 4: Internet Information Services
Then find ‘Internet Information Services’ and expand it.
Step 5: FTP Server
Check the ‘FTP Server’ and expand it.
Step 6: FTP Extensibility
Check the ‘FTP Extensibility’.
Step 7: Web Management Tools
Check the ‘Web Management Tools’.
Step 8: Confirm changes
Click OK.
Windows will proceed to install the tools. Then you can configure your server.
How to Configure an FTP Server on Windows 10?
Now that the IIS is enabled, we need to configure the server. To configure an FTP server on Windows 10, follow these steps:
Step 1: Open the search box
Press ‘WinKey + S’.
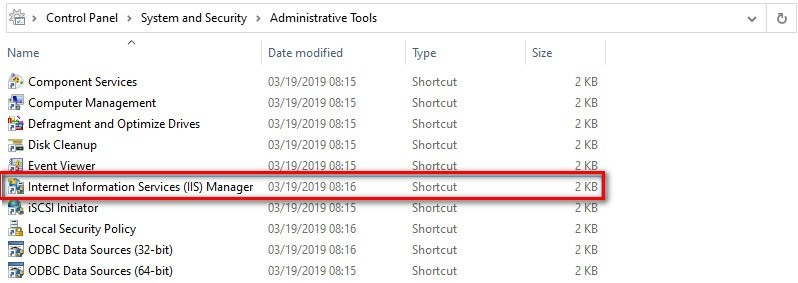
Step 2: Search Administrative Tools
Search for and open ‘Windows Administrative Tools’.
Step 3: Open IIS
Double-click on ‘Internet Information Services (IIS) Manager’.
Step 4: Select computers name
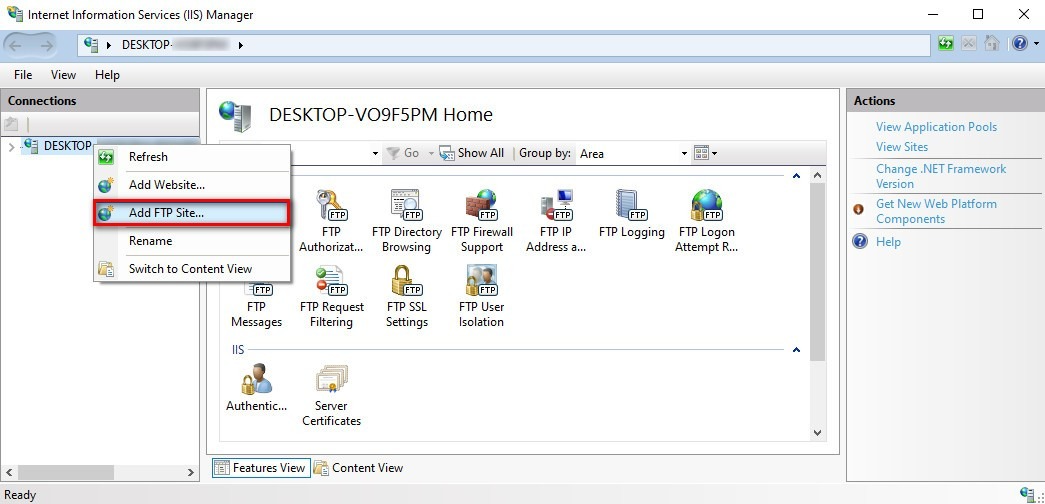
From the left-hand panel, right-click on your computer’s name.
Step 5: Add FTP site
Click on the ‘Add FTP site’.
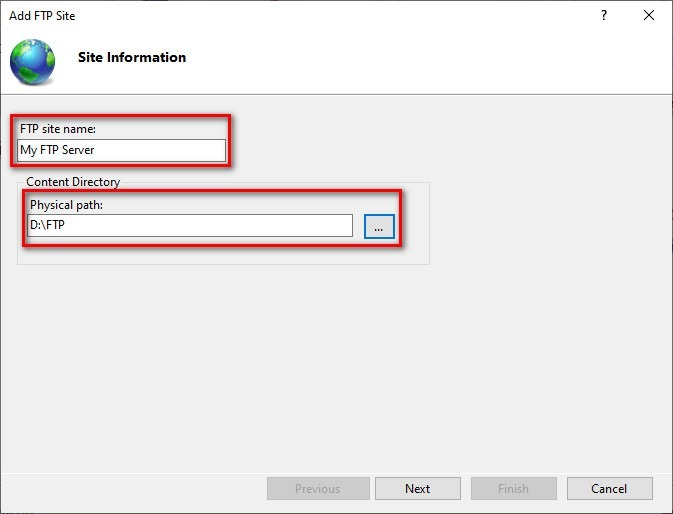
Step 6: Fill FTP site name
Type in a name for your FTP server in the ‘FTP site name’ field.
Step 7: Choose a folder
Choose a folder as the physical path of your FTP directory.
Step 8: Assign an IP address to your FTP.
You can assign an IP address and port to your FTP in the next step. You can leave them the way they are.
Step 9: SSL Status
If you use the FTP server as a test and security isn’t an issue, you can choose No SSL and proceed. Otherwise, you need to choose Require SSL. You can use Comodo’s SSL management tool to create an SSL certificate.
Step 10: Configure FTP
configure an FTP server on Windows 10
Step 11: chooses Basic
On the authentication section, choose ‘Basic’.
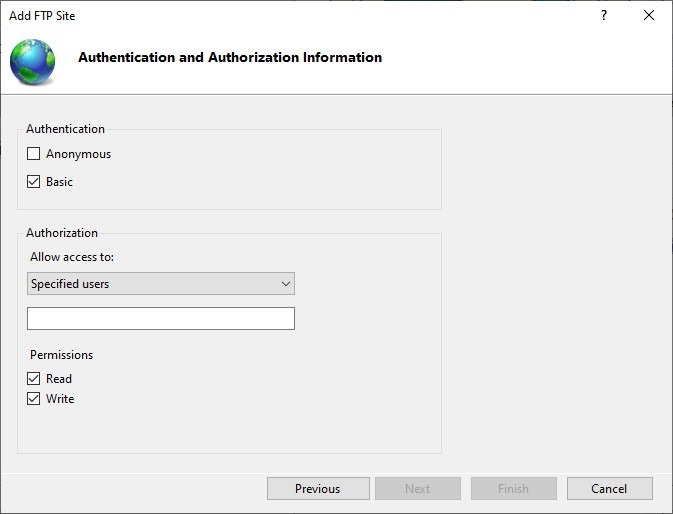
Step 12: Allow Access
Set ‘Allow Access to’ on ‘Specified users’.
Step 13: Enter your information
Type your name or your Microsoft account’s email address in the field below.
Step 14: Set permissions
Give yourself permission to Read and Write.
Step 15: Finish
Click on Finish.
Now you have an FTP server on your Windows.
Windows 10 VPS Hosting
Get yourself an efficient Windows 10 VPS for remote desktop, at the cheapest price out there. FREE Windows 10 running on NVMe SSD storage and high-speed internet.
Check Out Windows 10 VPS PlansHow to Configure Windows Firewall for an FTP Server?
By default Windows Firewall blocks all FTP access. To fix this you need to take the steps below:
Step 1: open the search box
Press ‘WinKey + S’ and type-in Windows Firewall.
Step 2: Allow an app or feature through Windows Firewall
Click on ‘Allow an app or feature through Windows Firewall’ from the left-hand menu.
Step 3: Change settings
Click on ‘Change settings’.
Step 4: Find FTP Server
Find ‘FTP Server’ in the list and check-mark public and private.
Step 5: Confirm changes
Click OK.
This lets you establish a local connection. Of course, if you want to access the server over the internet, you need to open the ports on your router.
How to Enable Port Forwarding on your Route?
Your FTP server needs port 21 open to connect to other computers on the internet. There are different ways to open a port on a router. Here is how it works on an Asus router:
Step 1: Search for cmd box
Press ‘Winkey + S’ and type in ‘cmd’.
Step 2: Open cmd
Open ‘Command Prompt’.
Step 3: Select ipconfig
Type in ‘ipconfig’ and press Enter.
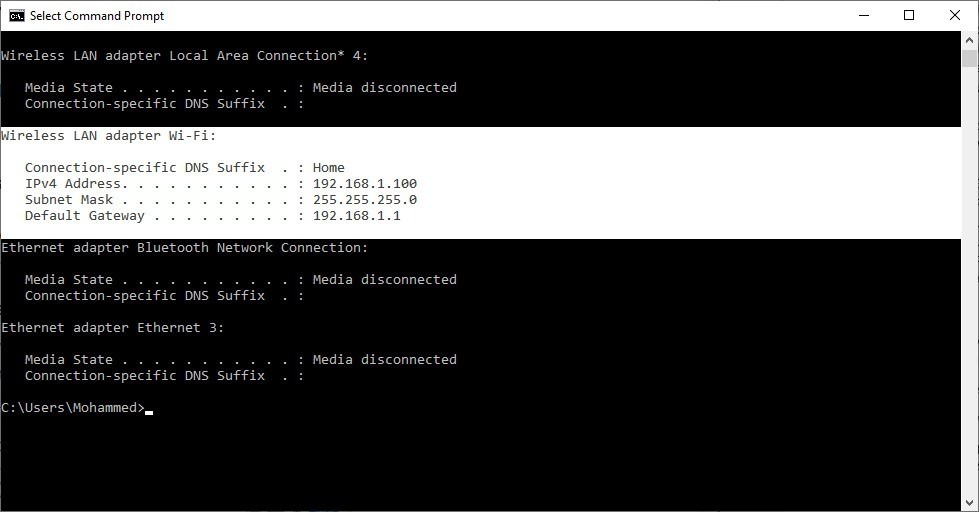
Step 4: Write the Default Gateway
Write the Default Gateway number down. (Normally, it’s 192.168.1.1)
Step 5: Browser
Open your web browser.
Step 6: Type the Gateway
Type the Default Gateway number on the address bar and press Enter.
Step 7: Sign in to the control panel
Sign in to your router’s control panel.
Step 8: Choose WAN
Choose ‘WAN’ from the left-hand menu.
Step 9: Create a new port
Create a new port forwarding with the following setup:
- Give your item a name under ‘Service Name’
- Port Range: 21
- Local IP: Use the IPv4 address on the ‘ipconfig’ command explained above.
- Local Port: 21
- Protocol: TCP
Step 10: Apply changes
Click on Apply.
Create an FTP Server in Windows 10 with Username and Password
The method above gives access to you or other users on the computer. But how can you make users log in with their username and password to access your FTP? The answer is to add a generic user with user-password authentication.
To add a user with a username-password authentication, follow these steps:
1- Go to Settings.
2- Choose Accounts.
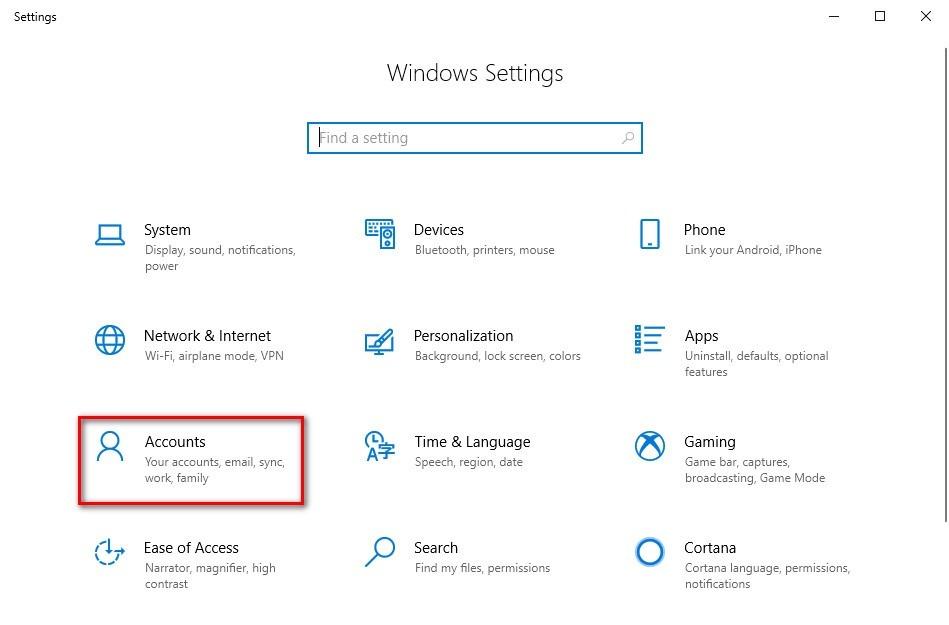
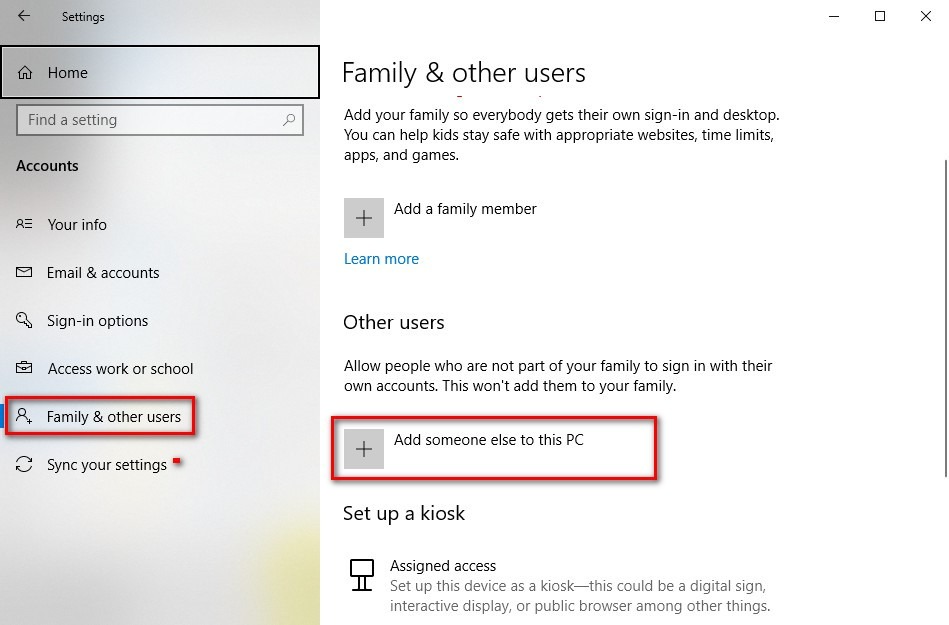
3- Go to “Family & other users”.
4- Click ‘Add someone else to this PC’.
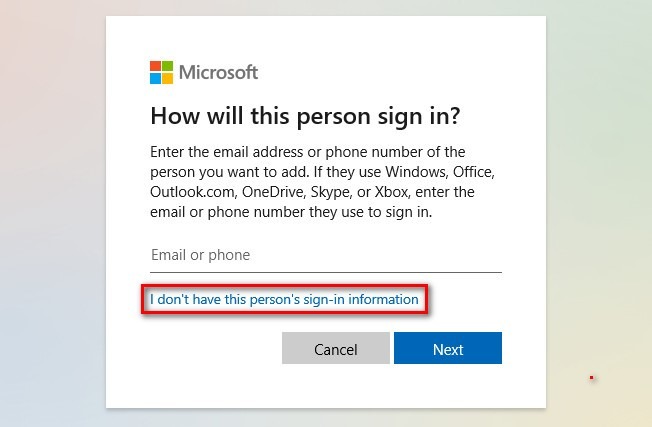
5- On the new window, choose ‘I don’t have this person’s sign-in information’.
6- Click on ‘Add a user without Microsoft account’.
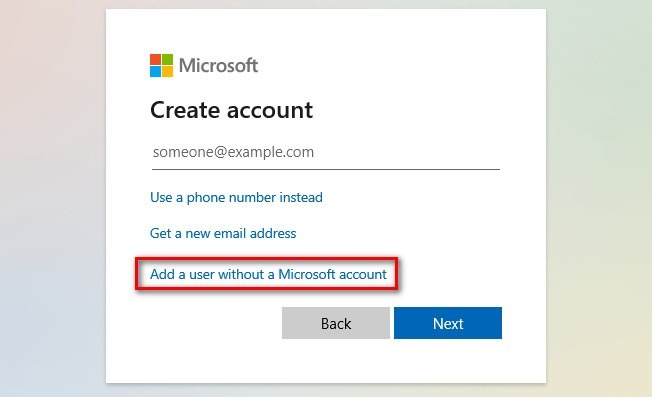
7- Choose a username and password and fill in the security questions.
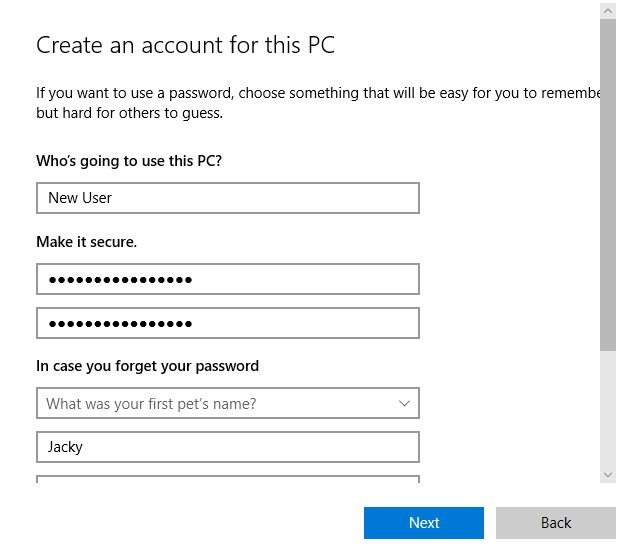
8- Click Next.
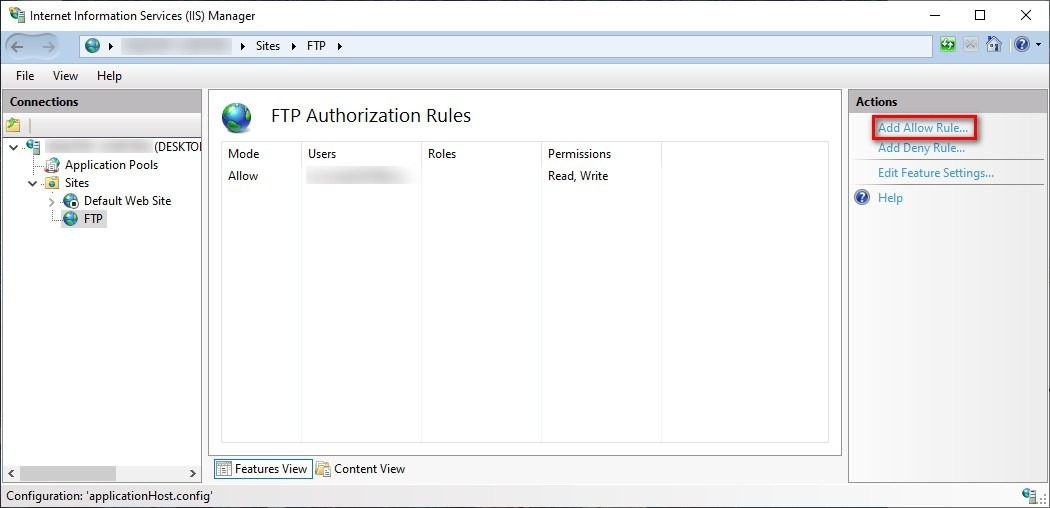
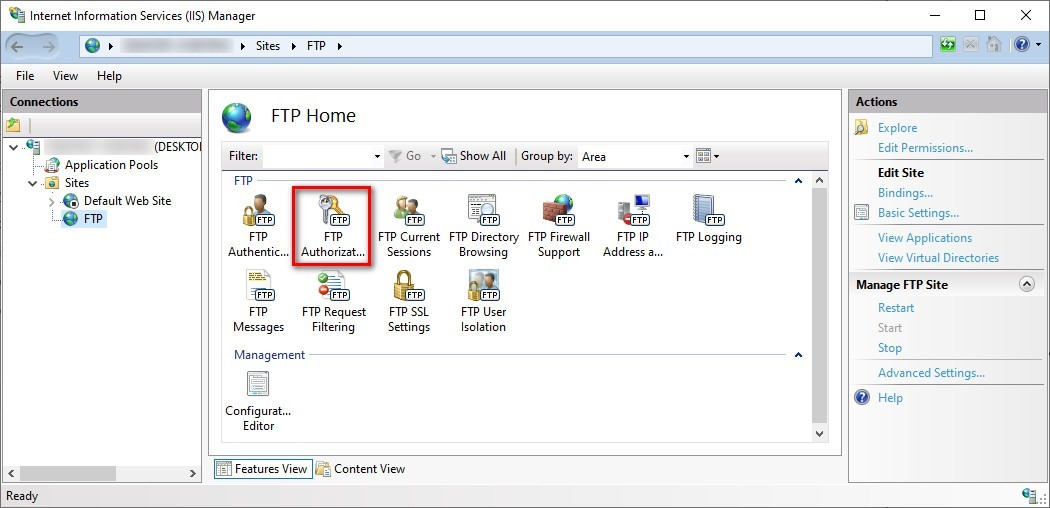
9- Now go again to ‘Windows Administrative Tools > Internet Information Services (IIS) Manager’.
10- Select your site from the left-hand panel.
11- Click on ‘FTP authorization rules’.

12- From the right-hand panel, choose ‘Add Allow Rule’.
13- Choose Specified users and add the username you chose above.
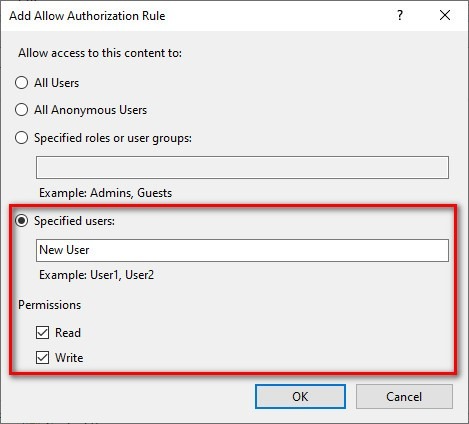
14- Give them the permissions you want.
15- Click OK.
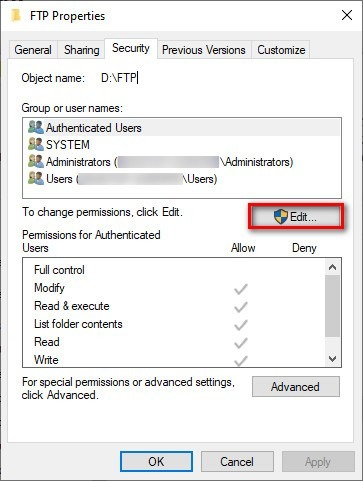
Now you need to add permission to the FTP folder as well. To do so:
- Go to the FTP folder.
- Right-click and choose ‘Properties’.
- Go to the ‘Security’ tab.

- Choose Edit, then Add.
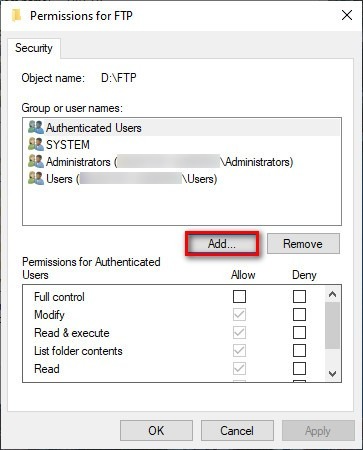
- Type-in the username in the ‘Enter the object…’ section and click Check Names.

- Click OK.
- Select the user and give them the permissions they need.
- Click OK.
Now you can use the username and password to access your FTP.
How to Create Multiple FTP Accounts on Windows 10?
To create another account, you need to take the same steps as above and then specify the Email Address of the new user.
To create multiple FTP accounts on Windows 10:
Step 1: Setting
Go to ‘Settings’.
Step 2: Choose accounts
Click on Accounts.

Step 3: Select Family
Go to Family & other users.
Step 4: Add someone else
Click ‘Add someone else to this PC’.

Step 5: Create an account
Add their Microsoft account or click on “I don’t have this person’s…” to create an account for them.
Step 6: Select (IIS) Manager
Go to ‘Windows Administrative Tools > Internet Information Services (IIS) Manager.
Also Read: How to install IIS on Windows 10?
Step 7: Select your website
Select your site from the left-hand panel.
Click on ‘FTP authorization rules.
Step 9: Add Allow Rule
From the right-hand panel choose ‘Add Allow Rule’.

Step 10: Add username
Choose Specified users and add the username you chose above.

Step 11: Access permissions
Give them the permissions you need.
Step 12: Apply changes
Click OK.
Now you need to add permission to the FTP folder as well. To do so:
- Go to the FTP folder.
- Right-click and choose ‘Properties’.
- Go to the ‘Security’ tab.
- Choose Edit, then Add.
- Type in the username in the ‘Enter the object…’ section and click Check Names.
- Click OK.
- Select the user and give them the permissions they need.
- Click OK.
How to Connect to an FTP Server on Windows 10?
Now that you have created your FTP server and configured it correctly, it’s time to connect and test your server out. If you have a client such as FileZilla, you can connect to the server. But also you can take the steps below using your web browser:
Step 1: Browser
Open your browser.
Step 2: Type IP address
Type in your IPv4 address with ftp:// at the beginning.
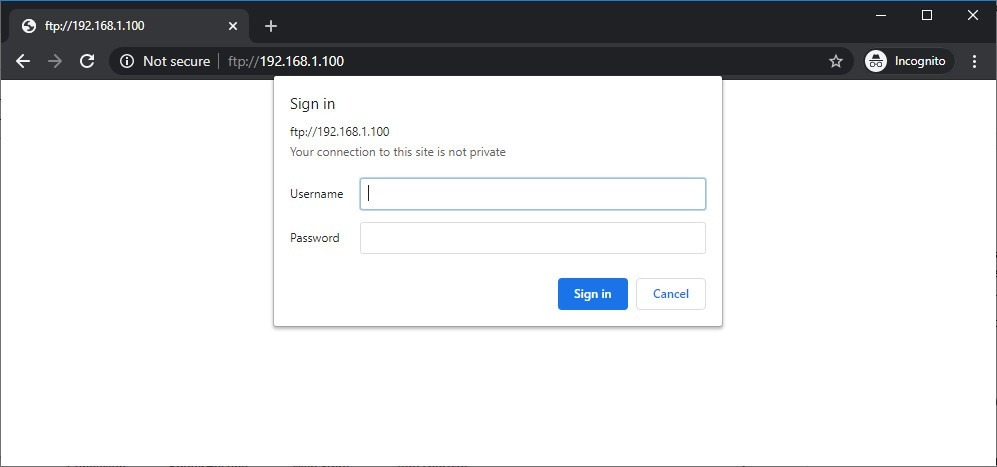
Step 3: Enter credentials
Enter your credentials to log in.

Step 4: Download files
Here you can see your files. To download or change the files remotely you can use FileZilla.
What are my Windows 10 FTP Server Credentials?
By default, you add your Windows account as the main FTP account. This means your Microsoft email and password are your credentials. Read the instructions on setting up user authentication above to use a more independent method. Or use a different account by adding another account to your FTP as I explained before.
Windows 10 VPS Hosting
Get yourself an efficient Windows 10 VPS for remote desktop, at the cheapest price out there. FREE Windows 10 running on NVMe SSD storage and high-speed internet.
Check Out Windows 10 VPS PlansConclusion
As you probably guessed from how long the article was, launching a successful FTP server on Windows 10 is not a short and sweet process. It is, of course, easy, but it takes many steps, and in the end, Windows 10 will not give you the best FTP performance possible. The most obvious way to set up a decent FTP server is to use a Linux server distro. For a lot of us, dual-booting our computer and entering a completely new environment will be out of the question. But I did promise that I’d reveal a much easier way, and that’s getting a VPS. A VPS is ideal for launching an FTP server with just the right resources. Plus, you can install a Linux distro or even a Windows Server edition with just a few clicks, allowing you to make the most of your FTP server without forcing you to switch your PC over to Linux. Cloudzy offers Linux VPS plans on top-tier hardware with super-fast bandwidth and connection speed. So, stop by and find out how our VPS can help with your FTP.


It is really great that windows 10 has such a feature that is able to become a FTP server without using any additional softwares
Helpful info. Fortunate me I discovered your site unintentionally, and I’m stunned why this twist of fate did not happen earlier! I bookmarked it.
I think what you posted made a lot of sense. But, think about this, what if you were to create a awesome headline?
I mean, I don’t want to tell you how to run your
blog, but what if you added a post title to maybe get folk’s
attention? I mean How to Create FTP Server in Windows 10?
| RouterHosting is kinda vanilla. You should look at Yahoo’s home page and
see how they create post headlines to get people to open the links.
You might add a video or a pic or two to grab people interested about what you’ve written. In my
opinion, it might bring your blog a little livelier.
Hi, Thanks a million for your incredible suggestion and concern for improving our blogs 🤩💛 I’ll surely pass it down to our content creation team. Please visit our blogs more often and cheer us up with your helpful comments🍃✨